Monday, December 2, 2013

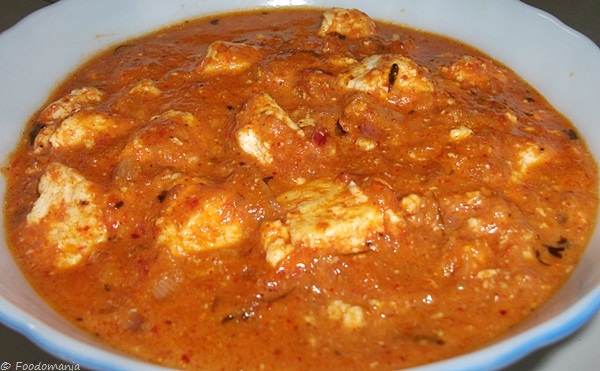
Afghani Paneer Masala

Afghani Paneer Masala

I’ll be honest. I haven’t tasted authentic Afghan food. I have never owned an authentic Afghan cookbook either. So if you are from Afghanistan and have no clue how I named the recipe ‘Afghan Paneer’, I’ll tell you how. I saw a Youtube video of an Afghan Chicken side dish  long back. I loved the flavors that went into making the gravy and wanted to ‘vegetarianize’ the same. So here’s my take on some of the flavors of Afghanistan!I wouldn’t call this a quick recipe. But it really is simple. I grilled my Paneer pieces first and then added to the gravy which made it crunchy on the outside & soft inside. I loved the texture. If you’re not too keen on grilling or baking and would like the Paneer just soft, skip the grilling part. And by the way, my latest discovery – Poppy seeds! They are proving to be wonderful in gravies! You should try this recipe!

Here’s what you’re going to need -

Start by grinding poppy seeds, almonds & cumin to a fine powder.

To the curd / yogurt, add the ground mix, chilli paste, red chilli powder, salt & a pinch of sugar

Give it a good mix

Add in the Paneer (cottage cheese) cubes and mix well making sure you don’t break any of the cubes. Let that rest in the marinade for at least 20-30 minutes for the flavors to seep in. (Do the same if you’re using Chicken pieces too)

Arrange the paneer cubes one by one on a grill pan. If you don’t have the grill function in your microwave, you can bake or deep fry.

Grill for 20 minutes or until the outsides turn crispy.

Do not discard the Yogurt & spices mixture remaining. Mix in the milk with it and set aside.

Heat oil. Add cinnamon, onions, garam masala and mix well.

Fry till onions are golden brown

Add in the crushed tomatoes / tomato puree

Add water and mix well. Let that come to a boil and reduce by half

Add the milk mixture to the pan and mix. Taste the gravy & check for seasoning.

Add the grilled paneer pieces. Alternatively, if you aren’t grilling, just add the pieces directly at this stage after marinating.

Mix well & let the mixture come to a boil.

Garnish with Coriander (cilantro) or Parsley leaves

Serve hot with any kind of rice or bread.

Afghani Paneer Masala
 
Prep time
Cook time
Total time
 
Cuisine: Afghan
Serves: 2-4
Ingredients
  • 2 cups Paneer Cubes (1 inch) (cottage cheese)*
  • 1 cup chopped Onions
  • 1 cup crushed Tomatoes / Tomato Puree
  • ½ cup Plain Yogurt / Curd (or use cream)
  • ¼ cup Milk
  • 1 tsp Garam Masala
  • 1 tsp Cumin seeds
  • 2 tsp Poppy seeds
  • 5-8 Almonds
  • 2 TBsp Green Chilli Paste (just run the chilli through food processor)
  • 1 inch Cinnamon stick
  • 1 tsp Red Chilli Powder
  • 2 TBsp Salt (to taste)
  • a pinch of Sugar
  • ½ cup Water
  • Vegetable Oil as required
Instructions
  1. In a food processor or grinder, add almonds, cumin seeds & poppy seeds. Grind to a coarse powder
  2. Add the powder to curd along with green chilli paste, Garam Masala, 1 tsp Salt, 1 tsp Red Chilli Powder & 1 TBsp Garam Masala powder. Mix well.
  3. Add paneer cubes to the curd mixture. Mix well making sure the paneer does not crumble and the curd mix coats all the paneer cubes. Let that rest / marinate for 20 – 30 minutes
  4. Arrange the cubes one by one on a grill pan & grill for 15 minutes r=or until the outside of the Paneer is golden brown. ALTERNATIVELY, if you don’t have a grill pan, you can bake the same @ 200C for 15 minutes. Set aside. (You can skip this step if you don’t want the crunchy texture of the Paneer)
  5. Don’t discard the yogurt mixture leftover. Mix well with milk and set aside.
  6. Heat 2 tsp Oil and add cinnamon, onions and saute until the onions are golden brown
  7. Ad tomato puree, water and mix well. Let it boil and reduce to half.
  8. Add the milk mixture to the pan and mix well. Let that again come to a boil.
  9. Add the Paneer pieces to the gravy and mix well.
  10. Garnish with Coriander or Parsley Leaves and serve hot with Rice or Bread

Paneer Butter Masala

Paneer Butter Masala

paneer butter masala
Paneer. I happen to love it. Do you? This dish happens to be one of India’s prized possessions – the most widely requested dish on any restaurant’s menu!paneer butter masala
As I sit editing these photos.. All 35 of them … it reminds me of how good this side dish is, and how fun that night was!! I bought home some fresh paneer intending to make a sweet out of it. My brother, the guinea pig, pleads with me to make his favorite curry instead. I cave. I make this along with my crunchy cottage cheese & peas pilaf. We stuff till our esophaguses  (esophagi? esophagus? What’s the right word? :D ) are full; and we can’t move a muscle. We swear never to stuff so much food into ourselves ever again! (and yet, we know that the next time I make Paneer Butter Masala, the same episode will be repeated! ;) )
Aaah.. .Good times! ;)
paneer butter masala
Don’t be intimidated by the ‘number of ingredients’ in the recipe. Organization is the key! Arrange all that you need BEFORE you begin. And follow the recipe step by step. You’re gonna have a dish worthy of being on the menu of any 5 star restaurant! Of course, you can make the low-fat version by substituting a lota ingredients. Scroll down to the recipe for ideas on substitutions.
PANEER BUTTER MASALA – The Recipe
What you need -

Soak broken cashews in some warm milk for 5-10 minutes.

To some more warm milk, add Garam Masala powder, Red Chilli Powder, Coriander powder (roast seeds & grind), dry fenugreek leaves (kasoori methi) and tomato ketchup.

Mix well and set aside.

To a blender, add tomatoes. You can blanch and remove the skins if you want.

Blend for 1-2 minutes to a smooth puree.

Set it aside.

In the same blender, add the cashew-milk mixture.

Grind for 2 minutes to form a smooth paste. Set that aside.

Cut the Paneer block into half inch cubes.

You can deep fry the cubes if you want. OR, heat some oil on a non stick pan and arrange the pieces on the pan. Let that fry on each side for 2-3 minutes of medium flame.

Remove and set aside. (This step is optional. You can add the paneer without shallow frying too)

To the same pan with high sides, add the butter, ginger & garlic paste.

Cook for a minute until the butter is fully melted.

Add the chopped onions

Fry for 2-3 minutes until the onions are golden brown.

Add the tomato puree prepared before.

Mix well & let that boil

Let that cook for 10-15 minutes until the tomato reduces to a paste and the ‘fat’ starts to release from the sides.
 
Add the cashew-milk paste as well as the milk-spices mixture.

Mix well and let that boil for sometime. (3-4 minutes till it reduces)

Add half a cup of water to loosen the gravy.

Mix & let it cook for 5 minutes until raw smell of spices disappear.

Season with salt, sugar. (Paneer butter masala is known to be a bit sweet)

Let the gravy boil for 5 more minutes.

Add the Paneer cubes.

Mix well & boil for 3-4 minutes.

Garnish with coriander leaves & serve!

5.0 from 2 reviews
Paneer Butter Masala
 
Prep time
Cook time
Total time
 
Recipe type: Sides
Cuisine: Indian
Serves: 4
Ingredients
  • 1 lb (500 gms) Fresh Paneer (Cottage cheese)
  • 1 cup Onions, finely chopped
  • 2 Tomatoes (or 8 oz canned tomatoes)
  • 5-8 Cashew nuts (use more for richer version)
  • 1 TBsp Butter
  • 1 tsp grated Ginger
  • 1 tsp Garlic, minced
  • 2 TBsp Tomato ketchup
  • ½ cup Warm Milk (use cream for richer version)
  • 1 TBsp Salt (adjust to taste)
  • 1 tsp Sugar (more for a more sweeter version)
  • 2 tsp Red Chilli Powder
  • 2 tsp Garam Masala Powder (homemade or store bought)
  • 1 tsp Coriander (dhania) powder (Roast coriander for 2 minutes & grind to a powder) {optional}
  • 1 tsp Kasoori Methi (Dry fenugreek leaves) {optional}
  • Water, as required
Instructions
  1. Soak broken cashews in quarter cup of warm milk for 5-10 minutes.
  2. To remaining warm milk, add Garam Masala powder, Red Chilli Powder, Coriander powder (roast seeds & grind), dry fenugreek leaves (kasoori methi) and tomato ketchup.
  3. Mix well and set aside.
  4. To a blender, add tomatoes. You can blanch and remove the skins if you want. Blend for 1-2 minutes to a smooth puree & Set it aside.
  5. In the same blender, add the cashew-milk mixture. Grind for 2 minutes to form a smooth paste. Set that aside.
  6. Cut the Paneer block into half inch cubes.
  7. You can deep fry the cubes if you want. OR, heat some oil on a non stick pan and arrange the pieces on the pan. Let that fry on each side for 2-3 minutes of medium flame. Remove and set aside. (This step is optional. You can add the paneer without shallow frying too)
  8. To the same pan with high sides, add the butter, ginger & garlic paste. Cook for a minute until the butter is fully melted.
  9. Add the chopped onions. Fry for 2-3 minutes until the onions are golden brown.
  10. Add the tomato puree prepared before. Mix well & let that boil
  11. Let that cook for 10-15 minutes until the tomato reduces to a paste and the ‘fat’ starts to release from the sides.
  12. Add the cashew-milk paste as well as the milk-spices mixture.
  13. Mix well and let that boil for sometime. (3-4 minutes till it reduces)
  14. Add half a cup of water to loosen the gravy.
  15. Mix & let it cook for 5 minutes until raw smell of spices disappear.
  16. Season with salt, sugar. (Paneer butter masala is known to be a bit sweet)
  17. Let the gravy boil for 5 more minutes.
  18. Add the Paneer cubes. Mix well & boil for 3-4 minutes.
  19. Garnish with coriander leaves & serve!
Notes
  1. Skip cashews altogether and you’ll have a less rich gravy
  2. Instead of butter, you can use vegetable oil too
  3. There’s no need to fry the paneer pieces.
  4. Make sure the milk / cream is warm. If its cold, it’ll split when added to the gravy

Thursday, November 28, 2013

Holiday Party Punch


Ingredients

2 cans of concentrated fruit juice (your choice)
8 cans of water
1 (2 liter) bottle of clear soda
1 sliced lemon
1 sliced orange
1 cup strawberry halves (optional)
ice

Directions

  1. In a punch bowl combine all of these ingredients.
  2. For a special variety, freeze fruit juice instead of water to make colorful ice cubes.

Gingerbread cookies

Recipe: Gingerbread cookies

Gingerbread people are virtually required for the holiday season and they are easy to make. If children help, it is great fun. The ideal dough is soft enough to roll out, yet stiff enough to hold the forms, resulting in finished cookies that are moist but not crumbly. Decorate with currants, cranberries, candies, frosting and confectioners’ sugar.

Ingredients
1 teaspoon plus ½ cup (1 stick) butter, softened
½ cup firmly packed light brown sugar
½ cup light molasses
3 cups all-purpose flour
1 teaspoon baking soda
¼ teaspoon freshly ground cloves
½ teaspoon freshly ground cinnamon
½ teaspoon freshly grated nutmeg
1 teaspoon ground ginger
½ teaspoon salt
¼ to 1/3  cup milk
Dried currants, red hots, fresh or dried cranberries, and silver dragees for decorating
Frosting and confectioners’ sugar

Directions
Preheat an oven to 350F. Using the 1 teaspoon butter, grease a large baking sheet.

In a large bowl, beat the ½ cup butter and the sugar until light and fluffy. Beat in the molasses until well blended. In a medium bowl, combine the flour, baking soda, cloves, cinnamon, nutmeg, ginger and salt.

Add half of the flour mixture to the butter mixture and beat until well blended. Beat in about ¼ cup milk, then add the remaining flour mixture, beating it in well. The dough will be very stiff. If it is too stiff and crumbly to roll out, add 1 tablespoon of additional milk.

On a well-floured work surface, roll the dough out to a thickness of about ½ inch, then cut into shapes using cookie cutters or by tracing with a knife around cardboard cutouts. Transfer the shapes to the prepared pan.

Decorate the gingerbread people with currant eyes and red-hots for buttons, pressing them into the dough before baking, or attach them with frosting after baking.

Bake for seven to eight minutes, or until the cookies are puffed and spring back when pushed with your finger. Transfer the cookies from the pan to a wire rack to cool. Decorate with frosting as desired.

Walnut stars - cookies

Recipe: Walnut stars

This cookie dough is conveniently made in a food processor, just as you might make pastry dough. The stars have a delicate crunch and lovely earthy-nutty flavour from toasted walnuts. (Using toasted nuts is important, so don’t skip this step!) The chocolate drizzle is icing on the cake . . . I mean cookie.
Ingredients
  • 1 cup (about 4 ounces) walnuts
  • ¼ cup granulated sugar
  • 1½ cups all-purpose flour
  • ½ cup confectioners’ sugar
  • ½ teaspoon baking powder
  • ¼ teaspoon salt
  • 8 tablespoons (1 stick) chilled unsalted butter, cut into 8 slices
  • 1 large egg yolk
  • 1 teaspoon pure vanilla extract 1 to 2 tablespoons cold water
      Chocolate drizzle
  • 3 ounces bittersweet or semisweet chocolate, chopped

Preparation
Cookie cutters needed:  star shapes that measure from about  1¾ to 2½ inches across the “arms”

1 Preheat the oven to 325°F. Spread the walnuts in a single layer on a small baking sheet. Toast in the oven for about 8 minutes or just until you start to smell them. Remove from the oven and cool to room temperature. Turn off the oven.

2 Pulse the cooled, toasted walnuts and the granulated sugar in a food processor until the nuts are finely chopped (not quite finely ground).  Transfer the mixture to a small bowl.

3 Add the flour, confectioners’ sugar, baking powder, and salt to the food processor. Pulse once to combine. Add the butter and pulse a few times until it’s chopped into tiny bits. Add the walnut mixture and pulse twice to combine. Add the egg yolk, vanilla, and 1 tablespoon of water and process just until the dough feels moist when pinched. Add ½ to 1 tablespoon more water, as needed, and pulse a few more times until the dough just starts to clump together. Turn the dough out onto a sheet of plastic wrap and gather into a ball. Press into a disk shape, wrap in plastic, and refrigerate until firm enough to roll out, at least 1 hour.

4 Preheat the oven to 350°F. Line a cookie sheet with parchment paper.

5 Roll out the dough on a lightly floured surface to a ¼-inch thickness. Use star cutters to stamp out cookies, arranging them about 1½ inch apart on the prepared sheet. Re-roll the scraps. Bake the cookies for 11 to 12 minutes or until light golden. Transfer to a rack to cool completely.

6 For the chocolate drizzle:  Melt the chocolate in a microwave-safe glass measuring cup or bowl in the microwave in 20 to 30-second bursts on medium power, stirring after each interval, until  melted and smooth. Let cool at room temperature for a few minutes.  Place the cookies close together, but not touching, on racks set over wax paper. Pour the chocolate into a small plastic bag or squeeze bottle. If using a bag, seal it and make a tiny cut in one corner. Working quickly, drizzle the chocolate in a zigzag pattern to make diagonal lines over the stars. Let the chocolate set completely before storing the cookies.

7 Store, layered between sheets of wax paper, in an airtight container for up to one week.

Chocolate-ginger crinkle cookies

 Recipe: Chocolate-ginger crinkle cookies

There is something magical about chocolate crinkle cookies. Little balls of dark chocolate dough are cloaked in a generous coating of confectioners’ sugar and lined up in neat rows on a baking sheet. Then, once in the oven, they are transformed, breaking through the protective white powder and organized line-ups, spreading and cracking as they please. These wondrously crispy and chewy medallions are not only beautiful, but they pack a powerful chocolate punch, as well. This recipe is a play on the traditional chocolate crinkle cookie. The generous infusion of powdered and crystallized gingers gives the cookie a spicy wallop that excitingly enhances and intensifies the chocolate experience.

Ingredients

¾ cup all-purpose flour
¼ cup Dutch-process cocoa powder
1 teaspoon baking powder
½  teaspoon salt
1 ½  teaspoons ground ginger
1 teaspoon ground cinnamon
½ cup (1 stick) unsalted butter at room temperature

7 ½ oz. semi-sweet chocolate
1 cup granulated sugar
¼ cup packed dark brown sugar
2 large eggs
1 teaspoon vanilla extract
¼ cup finely chopped crystallized ginger
Confectioners’ sugar for rolling

Directions

1 Whisk together the flour, cocoa powder, baking powder, salt, ginger, and cinnamon in a medium bowl.

2 Combine the butter and 3 ounces of the chocolate in a medium, heat-proof bowl. Set the bowl over a saucepan filled with about 11/2 inches of simmering water (being sure not to let the bottom of the bowl touch the water) and stir occasionally until the chocolate and butter have melted and the mixture is smooth.

3 Remove the bowl from the saucepan and set aside to cool slightly, about 10 minutes. (You can also melt the mixture in the microwave, heating it at about 20-second intervals and stirring periodically until it is melted and smooth.)

4 Stir the granulated and brown sugars into the melted chocolate mixture, using a wooden spoon or heatproof spatula. Drop in the eggs, one at a time, mixing briskly until smooth. Stir in the vanilla extract and gradually incorporate the flour mixture. Fold in the remaining 41/2 ounces of chocolate and the crystallized ginger. Cover the dough with plastic wrap and set in the refrigerator to chill for at least 2 hours or overnight.

5 Position a rack in the middle of the oven and preheat the oven to 350°F. Line baking sheets with parchment paper.

6 Shape the chilled dough into walnut-size balls, roll in confectioners’ sugar, and arrange them about 2 inches apart on the prepared baking sheets. (If your kitchen is quite warm and the dough becomes too soft, return it to the refrigerator until chilled and fairly firm.) Bake for 10 to 12 minutes, or until the cookies have spread and the tops are cracked.

7 Cool the cookies on the baking sheets set on wire racks for about 2 minutes before removing them to the racks to cool completely. Store the cookies in an airtight container or in a zip-top bag for up to 4 days.

Small black and whites - Cookies


Recipe: Small black and whites

Cookie exchange tip:  You can sprinkle a little red or green decorating sugar on the white frosting to add a festive twist to these already-handsome cookies.  Store them in a single layer on 1 or more plates or trays, covered with waxed paper, until serving, then present them in a straw basket with a large red bow tied around the handle for a splash of colour.

Ingredients
  • 4 cups cake flour
  • 1 ½ teaspoon baking powder
  • ¼ teaspoon salt
  • 1 ½ cups vegetable shortening
  • 1 cup granulated sugar
  • ½ cup nonfat dry milk powder
  • 1 teaspoon light corn syrup
  • 3 large eggs
  • ¾ cup water
  • 1 ¼ teaspoon vanilla extract

Icing
  • 2 cups confectioners' sugar
  • 1 tablespoon light corn syrup
  • 3 to 4 tablespoons water or milk, as needed
  • 1 teaspoon vanilla extract
  • 1/3 cup unsweetened cocoa powder

Directions
1  Preheat the oven to 350F.  Lightly grease or spray cookie sheets.

2  In a large bowl, whisk together the flour, baking powder, and salt.  Set aside.

3  In a large bowl, with an electric mixer, beat together the shortening and granulated sugar on medium speed until light, 2-3 minutes.  Beat in the dry milk powder and corn syrup.  Add the eggs, one at a time, beating well after each addition.  On low speed, gradually beat in the flour mixture, then the water and vanilla.  The dough will be firm.

4  Pinch off pieces of dough and roll between your palms into 1 ¼ -inch balls.  Set on the prepared cookie sheets, spacing them about 2 inches apart.

5  Bake in the center of the oven until firm when lightly touched with a fingertip and a toothpick inserted in the center comes out clean, 14 to 16 minutes.  Let cool on the cookie sheets for 2 to 3 minutes, then transfer to wire racks to cool completely.

6  Prepare the icing.  Sift the confectioners' sugar into a medium bowl.  Add the corn syrup, 2 tablespoons of the water, and the vanilla and beat with an electric mixer on medium speed until smooth and creamy, adding more water, 1 tablespoon at a time, as needed to make a smooth, spreadable icing.  (Or, you can use a food processor to make the icing, omitting the sifting and processing until smooth and spreadable.)

7  Transfer half of the icing to another bowl and stir in the cocoa powder, adding more water, ½ teaspoon at a time, as needed to thin to the same consistency as the white icing.  Cover both icings with plastic wrap until ready to use.

8  To ice the cookies, using an icing spatula, spread a thin layer of the white icing over half of the top of each cookie.  Starting with the cookies you iced first (so the white icing has time to dry), spread the chocolate icing over the other half.  Let the cookies stand until the icing dries.